Here's my second Easter Project that I promised. This Shredded Paper Nest project is a little messy , but definitely worth it. It's also a great way to do a little recycling.
 |
Items needed: shredded paper (I used a brown paper bag), wax paper, cling wrap, clear glue, and a bowl.
I used my husband's paper shredder in his office to shred a brown paper bag. |
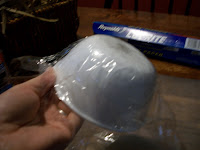 |
| First, wrap a bowl securely with cling wrap. |
 |
| Once the bowl is wrapped place it upside down on 2 sheets of wax paper. |
 |
| Now for the messy part! In a mixing bowl mix equal parts of water and clear glue. I used a 1/2 cup of each and it made enough for 2 nests. Dip hand fulls of shredded paper in the glue mixture. Try to remove some of the excess glue and then cover your prepared bowl with the paper. |
 |
| Press some dry shredded paper on your bowl. This will give it a "nesty" look. The original instructions for this project said that it takes 12 hrs. to dry....mine was still pretty damp after 12 hrs. To speed things up I got the help of my hair dryer! When it was close to being dried I removed the bowl and cling wrap. |

Finished!!!!
Wrapped in colored cellophane and tied with a bow would make cute gifts for teachers or co-workers!!


4 comments:
This is such a great site! I like the way you set this up! Great content! Thanks for sharing this!...Daniel
perfect for the egg project! :) i think i will do this for my girls' teachers this year. and maybe even my mom...super cute.
I agree with Kim. This is one I would love to try. For myself and for others. Thanks for sharing your gift. Shannon Dillard
I like that you used brown paper because it really looked like a bird’s nest! Plus, the fact that you placed eggs in it makes it more realistic. It may have been quite messy to do, but I agree that it does look worth doing.
Ruby Badcoe
Post a Comment