Showing posts with label Easter. Show all posts

Friday, April 10, 2020

Good Friday


Happy Good Friday Friends!

We are definitely living in some historical times! I would have never thought that I’d be teaching my kinder students through an online platform or wearing a face mask to grocery shop. Yet, here we are. It can be scary and lonely at times, but I have hope in my Lord and Savior. I know that He can cause good to come from even the bad times. I know that I can trust in His word when he says not to worry about tomorrow.

To keep things somewhat normal our church is having a drive-in Easter service. All you do is park in the parking lot (every other space) and listen to God’s word. We did the same thing last week for Palm Sunday too. For safety, social distancing is followed by staying in your vehicle and the building is closed. Better to go the bathroom before you get there. LOL

Tomorrow our church is having an Easter Egg hunt….. but this year volunteers hang Easter Eggs on a tree in their front yard. Each family that want s to participate is given a list of house addresses. As they drive around and find the houses, their kids can jump out and grab an egg! Below is a photo of the eggs that I’m working on for my azalea bush out front. I think they turned out pretty good. I used ribbon and pom poms from last years Easter baskets that I made.


Happy Easter Friends!
I hope you enjoy your weekend!
Remember this will be over soon and will definitely be something 
that we can share with our future grandkids.

xoxoxo

Josie


Saturday, April 19, 2014

Happy Easter!

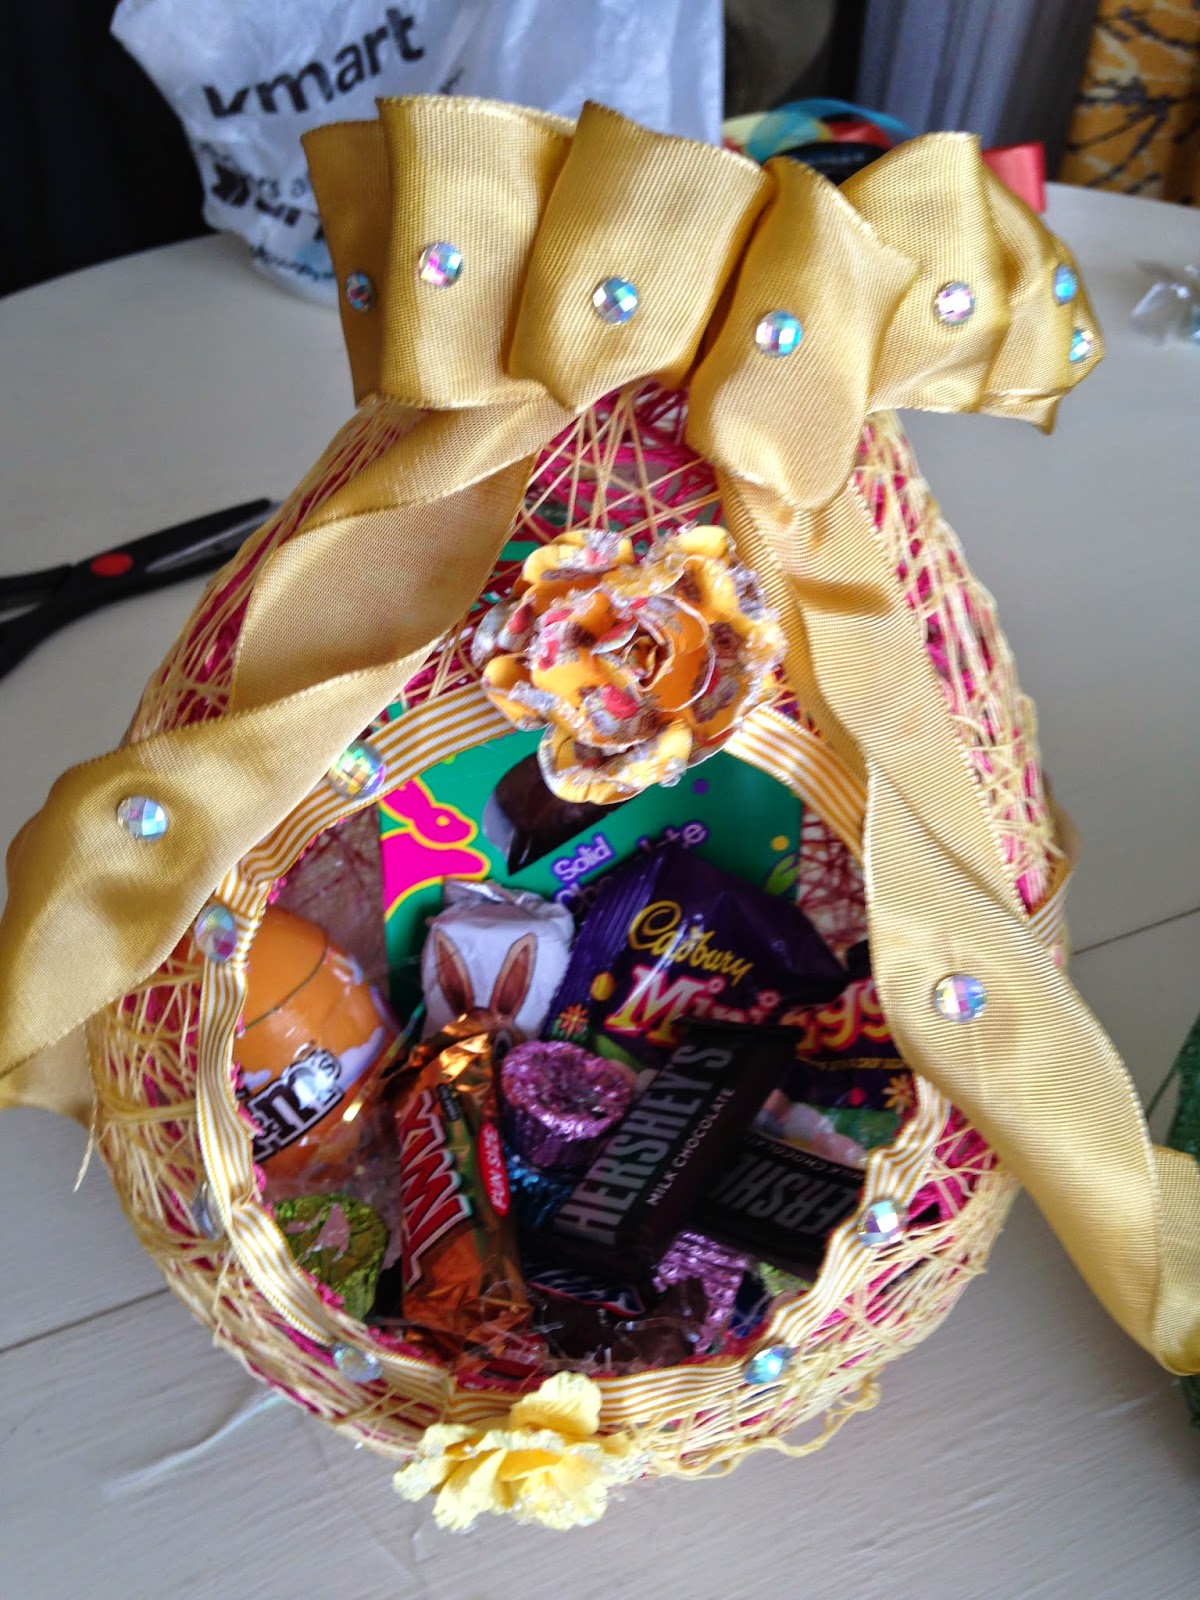
This year I made my kiddos' Easter baskets! I had been meaning to make these for the last several years, but some how never managed. When I was a little girl my mom made a version of these baskets, so these bring back memories. 


Supplies: embroidery thread (I like the thicker), balloons, Mod Podge (years ago mom used sugar water, I tried starch this time around and it did not work very well), ribbon and other embellishments, hot glue gun/sticks.
  • start by blowing up your balloons. 
  • soak the embroidery thread in the Mod Podge.
  • Tie the end of your string around the knot at the opening of the balloon and carefully start wrapping it. Be prepared because this is messy and a little annoying. The string has a tendency to slip until you really get going with it.
  • After it is wrapped, add more Mod Podge to ensure that the strings are soaked all the way through. I hung mine from a light fixture until they were dry. 
  • Once they dry, you can pop the balloon and and get to work cutting a hole in the front. I also pushed the bottom in on mine so that they'd stand upright.
  • Lastly, have fun decorating!
  • The following pictures that detail some of the steps.


I think that these 
turned out really cute! 
Happy Easter!
and Remember...
He is Risen!
xoxoxo
Josie


Sunday, April 8, 2012

Some of the Most Beautiful Words I know....

For God so loved the world
that he gave his one and only Son,
that whoever believes in him
shall not perish but have eternal life.

John 3:16 (NIV)


He has risen…
 just as
He said.

Matthew 28:6 (NIV)

Those are some of the most beautiful words I know!  
The thought of how much He loves us brings tears of joy to my eyes!


I've posted some of the Easter images caught around my house for this Easter Celebration! I didn't get to do as much decorating this year as I had wanted, but I thought I'd share the little that I did get to do. I've also posted some recipes! I hope you enjoy them! 

5 Cup Easter Salad
Mix one cup of each ingredient and then chill in your frig. Super easy breezy! 
Shredded coconut, mini marshmallows, mandarin oranges, crushed pineapple, sour cream.
Hint: I have found that it is better to add the marshmallows about 15 minutes before serving so that they don't get soggy.

Macaroni Salad
16oz of macaroni ( cook as directed on package)
2 cups of shredded cheddar cheese (sharp)
2 1/4 cups of mayo
1 1/2 cups of sliced green onions (with tops)
1 cup sweet pickle relish
1 jar (5 3/4 oz) of green olives (don't drain)
1 1/2 cups sliced celery
1 1/2 teaspoons salt
Mix all ingredients adding the macaroni last. Chill at least 4 hrs.

Deviled Eggs
6 hard boiled eggs
2 T. mayo
1/8 t salt
2 t sweet pickle relish
2 t. prepared mustard
1 t. sugar

Mix egg yolks with other ingredients. I use my mini food processor for mixing so that the mixture is smooth. Pipe into eggs and then sprinkle with paprika. Yummy! I love these eggs! They go fast around our house!


Sugar Cookies
(I got this recipe from my Betty Crocker cookbook ~ My kiddos love them)

1 1/2 c. powdered sugar
1 c. butter, softened (don't use margarine)
1 t. real vanilla
1/2 t. almond extract
1 egg 2 1/2 c all-purpose flour
1 t. baking soda
1 t. cream of tartar
Mix powered sugar, butter, vanilla, almond extract, and egg. Stir in remaining ingredients. Cover and refrigerate for about 3hrs. I usually keep mine in the frig for about 30 minutes. If you used margarine it will need to stay in the frig for the 3 hrs.
Heat oven to 375. Divide dough in half. Roll out and cut into desired shapes. Bake about 7-8 minutes. 
I then use Cookie Glaze to top off cookie. Mix 1 cup of powdered sugar, 1 T. warm water, and 1 t. light corn syrup. If needed add 1t. at a time of warm water until it is the desired consistency.
I then take each cookie and lay it face down in the icing. Gently lift and place back on the cookie sheet. This makes the icing on the top of each cookie to be perfectly smooth. It gives the cookies a bakery look! Make sure that the icing is completely dry before you layer them on your platter.


I can tell my kiddos have gotten older when I look up in the cabinet and realize that my jello jiggler Easter egg mold has not been touched! How sad! It used to be one of the first things I did! 

Speckled Easter Eggs


I've learned over the years not to spend a bunch of money on 
Easter baskets because they end up torn up and tossed away! 
These came from the Dollar Tree!
 I spent $3 and I think they are pretty cute!


I hope you had a wonderful Easter!


XOXOXO


Josie

Friday, April 6, 2012

Speckled Easter Eggs


These eggs are super duper easy to make! First, hard boil your eggs by placing them in a pot of water. Bring the water to a rapid boil. Turn off heat and cover eggs. Let stand for 30 minutes and then drain. Shock eggs with cold water so that they'll quit cooking.


Next, prepare your colored water bath for you eggs. Add 1 T. of vinegar to 1/2 cup of water. Add your food coloring. I chose blue for this year's eggs. I love blue!!
Then take a wet toothbrush and dip it in dark gray craft paint. Use your thumb to gently rub the bristles allowing paint to flick onto the eggs.


Happy Easter!


XOXO
Josie

Sunday, April 17, 2011

More Easter Creations..........


I had an idea about covering eggs with scraps of book pages and I stumbled across this blog by accident and found an image for what I wanted to do!!! Instead of using real eggs like I was going to do, she covered plastic Easter eggs instead.  What a great idea...now they won't need to be thrown away!  Check them out at the link below!


dearlillieblog.blogspot.com

Saturday, April 16, 2011

Spring Table Settings and Centerpieces - Southern Living


Spring Table Settings and Centerpieces - Southern Living

I found this site and thought I'd share it. I especially liked the Robin's Egg Place Cards! If the weather is nice these would add the perfect touch to an outdoor Easter Sunday lunch. Those of you who are looking for super cute kid desserts, check out the "Baa Baa Black and White Sheep Treats". These would make a really special class treat! Enjoy!!! 
Love,
 Josie


P. S Don't forget to click "follow" to get updates!!

Tuesday, March 29, 2011

Shredded Paper Nest!

Here's my second Easter Project that I promised.  This Shredded Paper Nest project is a little messy , but definitely worth it.  It's also a great way to do a little recycling.

Items needed: shredded paper (I used a brown paper bag),  wax  paper, cling wrap, clear glue, and a bowl.
I used my husband's paper shredder in his office to shred a brown paper bag.
First, wrap a bowl securely with cling wrap.
Once the bowl is wrapped place it upside down on 2 sheets of wax paper.
Now for the messy part!  In a mixing bowl mix equal parts of water  and clear glue.  I used a 1/2 cup of each and it made enough for 2 nests.  Dip hand fulls of shredded paper in the glue mixture.  Try to remove some of the excess glue and then cover your prepared bowl with the paper.  
Press some dry shredded paper on your bowl.  This will give it a "nesty" look.  The original instructions for this project said that it takes 12 hrs. to dry....mine was still pretty damp after 12 hrs.  To speed things up I got the help of my hair dryer!  When it was close to being dried I removed the bowl and cling wrap.  

Finished!!!!

Wrapped in colored cellophane and tied with a bow would make cute gifts for teachers or co-workers!!


Sunday, March 27, 2011

"To Dye for Botanical Eggs"


  I have always loved to do colored eggs each year with my kids.  This year I wanted  my Easter eggs be a little more special and unique!  Something that would say Easter and Spring all wrapped in one.  I came across an article in a magazine titled "To Dye for Botanical Eggs".  Just what I was looking for!
You will need the following supplies:  Flowers, boiled eggs, panty hose, twist ties, vinegar, water, food coloring, bowls for your dye, and plenty of paper towels.  When choosing flowers pick ones that have a round center and distinct petals.  I experimented with others and they didn't work well at all.
First, cut your panty hose in 4" squares and prepare your dye colors....don't forget to add a little vinegar to the dye.
Next, place your flower or leaf face down on the boiled egg.  Also, if you don't get the flower or leaf on the egg firmly then to much dye will seep under.  I had many failed attempts before I got what I wanted!  Wrap the panty hose tightly around the egg and secure with twist tie. Place egg in the dye until you have the color you want....the longer you wait...the deeper and richer the color looks!
Unwrap your egg and you have a beautiful  botanical flower print!!  
I think this is absolutely BEAUTIFUL!!
I can't wait to make these again!!
P.S. You can make your own earthy tone dyes by boiling purple cabbage, yellow onion peels, cranberries, blueberries, etc.